I took the nursery over and showed it to Mom before delivering to Ann. Mom really liked it and, to my surprise, accepted my invitation to go with me downstairs to give it to Ann. (Mom rarely leaves her apartment.)
Ann was thrilled that Mom had come down with me and was very touched when we gave her the nursery. Then it got a bit emotional when Ann saw the book "Guess How Much I Love You" on the dresser. What a piece of serendipity! It turned out that that was the first book she bought for Jessica when she was a baby and she had already bought Jessica a copy for the new baby.
Wednesday, August 22, 2018
Tuesday, August 21, 2018
Nursery finished
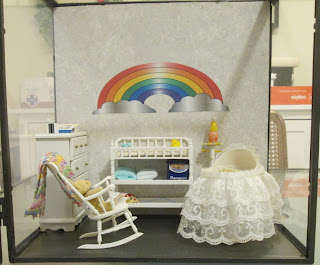
Way back in April, I started work on a nursery for the daughter of a friend. Over the months I've sort of toyed with it but other than putting in the back wall haven't really worked on it.
Jess and her husband didn't want to know the sex of the child so that put some constraints on the project. All I knew was that they were planning on using grey in the room and they had to have a rocking chair.
So, until now, it's been one of those projects that you ponder over in your mind and maybe try a few things here and therel
Yesterday, with my cranberry glass vignette finally finished, I decided to get to work on this one.
Because it had to be gender-neutral, the pink trim and bows had to go.

Fortunately, they were stitched on and very lightly glued and came off easily.

At Driving Miss Dolly, I had picked up a couple metres of lace with blue, pink, green and yellow accents with this in mind.

But the other day, I spotted this white satin-look ribbon in my stash so decided to use it.

Here, I've glued it along the edge of the bassinet and held it in place with clothespins until the glue dried. Once that was done, I glued the remainder of the ribbon in place and held it until the glue took hold.

So one thing completed!

The dresser:

The top of the dresser:
The rocking chair from Trineke, an afghan from my stash, a jointed teddy bear and "The Places You'll See" by Dr. Seuss.

The baby in the bassinet.

I wanted to add some colour to the room so I thought about maybe Sesame Street characters or Winnie the Pooh characters but the more I thought about it, decided on a rainbow. Opened a word document and inserted a rainbow, printed it on cardstock, cut it out and glued it to the back wall.

The change table:
TIP: Baby washcloths (from Dollarama) are great for towels, especially. But they're a bit difficult to work with so I make a pattern in a word document (insert a shape and size it to what you what, print it out then tape it to the washcloth and cut along the tape). Then fold as required.
Originally, I had cut out a piece of grey sculptured carpeting for the room but since the floor was already grey and I got thinking - carpet is warm but it's also a germ catch-all so I decided to go with just the original floor.
I'm really looking forward to showing this to Mom tomorrow then delivering it to Ann.
Jess and her husband didn't want to know the sex of the child so that put some constraints on the project. All I knew was that they were planning on using grey in the room and they had to have a rocking chair.
So, until now, it's been one of those projects that you ponder over in your mind and maybe try a few things here and therel
Yesterday, with my cranberry glass vignette finally finished, I decided to get to work on this one.
Because it had to be gender-neutral, the pink trim and bows had to go.

Fortunately, they were stitched on and very lightly glued and came off easily.

At Driving Miss Dolly, I had picked up a couple metres of lace with blue, pink, green and yellow accents with this in mind.

But the other day, I spotted this white satin-look ribbon in my stash so decided to use it.

Here, I've glued it along the edge of the bassinet and held it in place with clothespins until the glue dried. Once that was done, I glued the remainder of the ribbon in place and held it until the glue took hold.

So one thing completed!


The top of the dresser:
 |
| Kleenex box made from a cubic bead with a small piece of tissue glued in place; "Frosty the Snowman" book made by a Kelowna miniaturist, "Guess How Much I Love You" (maker unknown); and a piggy bank (a very early piece by Janice Crawley). |
The rocking chair from Trineke, an afghan from my stash, a jointed teddy bear and "The Places You'll See" by Dr. Seuss.

The baby in the bassinet.

I wanted to add some colour to the room so I thought about maybe Sesame Street characters or Winnie the Pooh characters but the more I thought about it, decided on a rainbow. Opened a word document and inserted a rainbow, printed it on cardstock, cut it out and glued it to the back wall.

The change table:
 |
| The top has a pair of bootees (made from Bunka by my friend Cheryl H. from Nova Scotia) and a yellow rubber ducky that was originally a push pin. Middle shelf has two receiving blankets made from baby washcloths and a Pamper box from my stash. The bottom shelf has a Fisher Price telephone. (The telephone is really dated but it was in my stash and I love it. Ann will probably remember it but doubt that Jess will.) |
Originally, I had cut out a piece of grey sculptured carpeting for the room but since the floor was already grey and I got thinking - carpet is warm but it's also a germ catch-all so I decided to go with just the original floor.

Thursday, August 16, 2018
Lots of How To's and a 'Where to Find it'
With the cessation of publication (as of the September 2018 issue), Miniature Collector was a wonderful source of information for miniaturists.It will be missed.
One of the features in Miniature Collector magazine over the years was Kids Korner. It had more than a hundred tutorials aimed at beginning miniaturists. It's a great source of ideas that can be made as written or as a starting point for your own take on the item.
So far, the Kids Korner articles are still available on-line. It's hard to say how long they'll remain available so I would suggest you check them out sooner than later. Click here to take a look.
Another source of tutorials for beginners is also available from the Mini Time Machine Museum in Tucson, Arizona. (If you're a "snowbird", I highly recommend going to this museum.) Their tutorials are available here.
Forgot to tell you about finding these garbage cans at West Edmonton Mall last week. A few years ago, these seemed to available almost everywhere - even the little convenience store next door had them. So when Joanne and I were passing Bubble and Gum at WEM, I popped in to take a look and there they were! This is from my stash but Bubble and Gum had them (filled with gum or candy, don't recall) in wild neon colours.
I cut off the hinge that connects the lid to the can. I have even cut out the centre of the handle. Painted with silver or chrome nail polish, it makes a great addition to a scene.


Monday, August 13, 2018
Little Vignette for Me - FINISHED
Last week I showed you the little vignette that I was working on.
I decided to go with the sideboard with the crack in the top. Even with the slight damage, I liked it so much better than the one with the drawers.
For the picture above the sideboard, I decided to go with the picture my DS Marie had sent me of the rainbow framing an old building near Spirit River (I think).
I still haven't made the third candle to go in the candlestick but I'm pleased with how it turned out.

The vignette closed: Don't like that I can't get a decent picture.

M.E.E. Summer Field Trip
On Wednesday, August 8, some members met at West Edmonton Mall to check out a few stores that Sunni and Teresa had checked out ahead of time then for lunch at the Old Spaghetti Factory.
Due to a communication problem, Joanne and I only checked out Oomomo, the Japanese $3 store. It has a lot of things of interest to miniaturists including some nice plastic display pieces and LOTS of wonderful nail art that works in both 1:12 and 1:48 scale.
I only picked up two things:
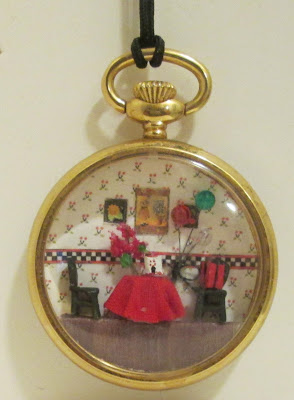
In 2003, DD Leanne was living in Dallas, Texas, and I flew down to spend some time with her. My trip coincided with Dallas MayFest so I was able to attend my first major miniature show! One of the classes was a large group class where we made this Birthday party scene in a pocket watch.
It's normally kept in one of my display cabinets but occasionally I wear it as a necklace to give people an idea of what I do as a miniaturist....which I did on Wednesday. When I bought the globe at Oomomo, the sales clerk noticed and commented on it. That gave me the opportunity to tell her that I was buying the globe as a dollhouse miniature. She was quite impressed.
When those of us who were able to attend met up at the Old Spaghetti Factory, we had a good time catching up. Good time!
Due to a communication problem, Joanne and I only checked out Oomomo, the Japanese $3 store. It has a lot of things of interest to miniaturists including some nice plastic display pieces and LOTS of wonderful nail art that works in both 1:12 and 1:48 scale.
I only picked up two things:
 |
| This 1/4" hole punch is really well made and has a movable guard that catches the punched pieces. My old punch is worn out. |
 |
| This etched glass globe is 2 1/2" tall and quite lovely. Although my relatives in New Zealand would be disappointed to know that New Zealand is not on it. ;-( Only shows the continents! |

It's normally kept in one of my display cabinets but occasionally I wear it as a necklace to give people an idea of what I do as a miniaturist....which I did on Wednesday. When I bought the globe at Oomomo, the sales clerk noticed and commented on it. That gave me the opportunity to tell her that I was buying the globe as a dollhouse miniature. She was quite impressed.
When those of us who were able to attend met up at the Old Spaghetti Factory, we had a good time catching up. Good time!
Edmonton Show and Sale September 16, 2016 DEALER LIST
As good as the list is so far, we are always looking for more dealers so if you know of someone who might be interested, please contact me . Final date for accepting dealers is August 31.
This is one of the few places where you can still see and feel items for your dollhouse so please support it.
DEALER LIST 2018
Another World Miniatures (Linda
Maddaford, Bev Perret)
1:12 scale accessories, kits, metal minis,
silks, lace, silk ribbon, hat straw, hard to find supplies, furniture, some
1:48 supplies, Swarovski crystals
Bits by Barb (Barb Striethorst)
Plants/flowers (assembled and kits),
petals/leaves, laser cut German items, rugs, food items
Mini food, candles, utensils
for BBQing, containers, a variety of handmade miniature items
Live
A Little Miniatures
(Hoanie Yong)
Chandeliers, wall sconces, ceiling lamps, Christmas
decorations and other misc. items
Luba Barnes
Miscellaneous
miniature items and some 1:48 scale items
Janice Crawley, IGMA Fellow
1:12 ceramic dishes,
Toby Mugs, figurines, tiny porcelain dolls (1” – 2”)
Judy Mitchell
Various handmade accessories in 1:12
Miniature Enthusiasts of Edmonton
Children’s Grab Bags
Membership Information
Miniature Enthusiasts of Edmonton
Estate Sales Tables
Mini Minutia (Tina MacDonald)
Fabric, turnings, pottery, 1:12 and 1:48 kits
MiniLAND, VICTORIA
Full line of
roomboxes, furniture and accessories
Our pickup service to the show.
National Association of Miniature
Enthusiasts
Information about N.A.M.E.
Needleart Treasures by Rosalle
Crocheted accessories for the mini home
Pat Makarowski
Handmade canned fruit, vegetables. Assortment of 1:12
furniture, mini food, 3D printed items.
Sherri MacRaild, IGMA Artisan
Miniature toys, seasonal items, plans.
Reenie’s Teenies
1:12 scale handmade
miniatures (food, books, toys, etc.)
Cheques on the way…
Tiny Treasures (Louise Zawada)
Mini furniture, supplies, handmade minis, etc.
Val’s Creations (Val Corraini)
Miniature dolls and
related items
Wee Woolies (Linda Austin)
Crochet work, plants,
tools
Monday, August 6, 2018
A little vignette for me
I knew I wanted to use the red satin Shiseido box that my friend Wendy found for me in the freebie box at a garage sale to highlight a couple of the cranberry glass pieces that I have.
 |
| 8 1/8" high, 7 1/16 wide and 3 1/2" deep |
I needed to make a "floor" that would be even with the bottom of the front opening of the space. So to get the curve right, I drew a line along the front edge of the container.

Then I took that piece and fit it inside the front part of the container.

Took another piece of paper to match the back half of the container...and patched them together.


Dry-fitted them then glued them to a piece of matboard and cut it out.

Then I put a 1/2" piece of foamcore in the bottom of the piece to bring the floor up to the bottom of the opening.

Dry fit it once again.

Took that piece to Craft night in the building where I covered it with strips of cherry flooring with wood glue.


Trimmed it all around. Then coated it with J.W. etc. matte varnish. When that was dry, I put it under two of my favourite books for this purpose to flatten it.
When I first took it from under the books, it was still a bit warped so I varnished the back and left it to dry again and that seemed to do the trick and leave it flat.
In the meantime, I used carpet tape to apply the wallpaper to the sides of front of the piece.


I fitted a piece of the RL wallpaper that I had chosen to the back of the room then I put a piece of carpet tape across the top of the back.
I really like the double-sided carpet tape for attaching wallpaper but it's a touchy thing...you really have to be careful to get it right...but when you do, it's perfect!
Here's the carpet tape in place at the top of the back part of the vignette.

Here, the wallpaper has been attached at the bottom and the sides!

NOW! Floor in place...

Clamping it down!

Then to dress it...
The pieces I want to display are the triune cranberry glass vase, the triple brass candleholders and the cranberry glass bowl. I got the brass candleholders from an estate sale and although they were in original packaging, one of the candles was missing. I have Chrysnbon candles but they are fatter and shorter so I so for now I'll leave the shortest candlestick empty. At some point, I'll try to make a matching candle to fit there.
My first thought was to go with this cabinetl I love the shape of this one but it has a crack in the top of the piece.

So I thought to go with this one...

I like it but, on looking at it, thought I needed to reverse the order of the candles. Like this much more.

Had thought about putting this mirror above the sideboard...until I moved it into the box itself...WAY too high and WAY too big.


Now, maybe I don't need anything else...
BUT even with the crack in the top, I still like the original sideboard..
Have to think on this..........
Sunday, August 5, 2018
An oldie but goodie - POTATO CHIPS1
You'll never look at a sweet pepper in the same way again!
The next time you cut one up, save the core with the seeds. Set it aside and let it dry then scrape off the seeds.

And there you have wonderful mini potato chips!

Just put them in a bowl with a smaller bowl of dip made from a dab of spackle.
Subscribe to:
Posts (Atom)