Wednesday, December 26, 2012

Belated Christmas wishes

I had hoped to post yesterday to wish you all a very Merry Christmas but by the time the day was over, I was just too tired.

I got some wonderful gifts, some mini - some not, and I'll tell you about them tomorrow.

BUT....

You know how sometimes a special 'little' thing just means the world to you.

My DS Marie called me earlier this week and told me she had popped a little "Put a smile on your face" thing in the mail to me (she's wonderful that way) but that she didn't think it would arrive until after Christmas.

Christmas Eve I took the garbage out and stopped to check for mail on my way back into the building.

Marie's card had arrived and it was a card with a scan of a picture of Mom, me and my three sisters taken Christmas of 1957 when I was 10. And in the background, on the piano, is my first dollhouse!!!

In the back against the dollhouse is Mom; second row is DS Shirley; bottom row from the left is Marie, Carol and me.
This is a scan of a scan of an old photograph so it's not a great picture but it means the world to me.

The dollhouse was made from six mandarin orange boxes....really, there was a time when they actually came in wooden boxes! It was all wallpapered and furnished with plastic furniture.

We're all holding our special doll gifts. I remember the dollhouse but I don't recall the dolls that particular year although I don't remember ever receiving a doll for Christmas that didn't have an extensive wardrobe that Mom had sewn.

(Having sewn Christmas gifts for Sean and Leanne when they were small, I developed a much greater appreciation of what she had accomplished in terms of time - when the HECK had she done all that for four girls - and secrecy!)

Mom was, and still is, an incredible seamstress. She made almost all her own clothes most of her life and our clothes until we were individually about 12, then she taught us to sew and we then made most of our clothes - although she still made 'special' pieces like party and graduation dresses.

Now 89, she buys many pieces but, every once in awhile, she gets out the sewing machine and makes herself some new blouses and vests.

***********

One of our family traditions is 'smoking' black licorice cigars when "the girls" get together. Here's Mom smoking hers on Christmas Day.


We got talking about the last Christmas Dad was with us. The next year Mom had given us all pictures of them  in their "Santa" array as they arrived at our home on Larose Drive.

Dad's cigar is just below the picture!

So I brought out my copy of the picture out and Shirley gave Dad his cigar!


Saturday, December 22, 2012

Fabric for the quilt shop

From the time I was about 12 to about 15 years ago. I made a good portion of my own clothes and a lot of Sean and Leanne's when they were small. When we moved to the condo, I got rid of almost all my fabric stash but since then my stash of small pieces of fabric suitable for minis has grown to huge proportions!

I've used virtually none of it but the lure of fabric is SO strong that I'm constantly buying fat quarters, pieces of fabric at miniature shows and picking up used clothing (particularly silks).

Stacked in the closet...

Spread out and opened...
LOTS of pieces (about 80) that should be suitable for the quilt shop:


TIP: It's not always easy to tell at a glance if a print is small enough to be 'right' in miniature. Here's a little tip you might find helpful.

Cut a one inch square in a piece of cardstock that's at least 4" x 4" - large enough that you have a good sized border around the hole. Tuck it in your purse or wallet so you can check out any fabric you're looking at.

Place the card on the fabric and you will see what a square foot of the fabric would look like in RL.

Here is how it looks using seven different pieces of fabric. It really focuses your attention on the scale.


Now the fun (?) begins...I'll cut pieces 4" x 4", fold them in half to wrap around the fabric bolts; more pieces 1.5" x about 1" for fat quarters. (I know the scale size would be 1.5" x 1.833" for the fat quarters but the thickness of the fabric would make them too thick with the extra fabric length.)

I know a quilt shop should have jelly rolls but I don't know if I feel quite up to that - maybe I'll try making one or two.

quilt shop, Vern's attic

OOPS! Wrote this Thursday and forgot to publish it.....

I was mostly just sitting around watching TV today so I made a bunch more bare fabric bolts for the quilt shop.


These are thicker than I would have liked but they'll work well in the cabinets I plan for the back wall. I now have 53 made so it's time to dig out the fabric boxes and start cutting pieces of fabric to cover them and make some mini 'fat quarters'.

This is coming together in my head which is always a good sign. LOL

My friend Velma gifted me with a lovely box of Ferraro Rocher chocolates. I've eaten WAY too many of them but I've also flattened and smoothed the lovely gold foil they're wrapped in to put in my stash. VBG

,,,,,,,,

There are five of us in St. Albert who are stalled on our MEE project attics so we've decided that we'll get together early in the New Year and get them much further along now than they are now. Installing the lighting is scheduled for the MEE workshop the first Tuesday in February so we want to be ready for that.

Once the settings are finished, we can get started on the goodies inside. This is my very favourite part! And I think it is for most of us...

I love figuring out what I want to put in a scene/room and figuring out how to make it. I have a list of about 60 things I want to go in this so I'm looking forward to filling it and writing the notes that will explain each item to grandchildren Jonah and Holly.


Tuesday, December 18, 2012

For my sisters...

On Sunday, I posted about not having done a miniature scene for my sister Shirley but mentioned I had a thought about that....

Shirley and I have talked over the years about the fact that I had never done a piece for her but, like so many of us, she didn't really have room for anything that I made only so she would have one...and we never really came up with anything that was "right".

Shirley was probably the closest of the four sisters to Dad so I discussed with Leanne giving the miniature of Dad's workshop to her and Leanne agreed.

I've always liked having this particular project here for two reasons: (1) it's my Dad, and (2) I did some really great work (especially the scroll saw and sander) for it.

BUT it's going to the very best home, I get visiting rights and it'll return to Leanne eventually. Doesn't get much better than that!

...........
One of the really great things about the condo I live in is the number of amenity rooms we have. I know I've mentioned our library, our coffee club (Christmas lunch tomorrow), but I don't know that I've mentioned our craft room and the group of ladies who meet there on Tuesday nights. I don't get to attend all that often since MEE meets on Tuesday nights but I've been able to attend recently.

I took in the afghan for Vern's attic tonight to show it off.


I also took in the styrofoam packaging I mentioned on Sunday and a word document I had printed out with labels for the end of fabric bolts.

I cut out a bunch of 2" x 3/4" pieces of styrofoam and glued the labels on the ends. The styrofoam was thicker than I had thought but it will work well to make fabric bolts with lighter pieces of fabric.


I have several boxes of fabric scraps and fat quarters so once I get about 100 of these made, I can just sit in front of the TV and wrap fabric around them. Almost all the women who come to "Stitch and Bitch" quilt and I've already had offers of fabric scraps so making the fabric bolts should be the easiest part of the quilt shop.

This doesn't mean that I've abandoned doing Vern's memory attic. But until I get the attic itself built, this is something I can work on and prepare for.

That's my story and I'm sticking to it....


Camp Mini Ha Ha

I've mentioned Camp Mini Ha Ha in Nova Scotia here several times. It's an incredible experience and I made SO many wonderful mini friends there.

As an alumnus, I've known about this CBC radio interview for quite some time but totally forgot to mention it here. (Hanging head in shame!)

But Joanne heard it on CBC yesterday and reminded me of it. It's 25 minutes and well worth the listen. There are also some great pictures on the CBC website.

Sunday, December 16, 2012

OH, NOOOOOO!!!!!

One of my first posts on this blog was on April 27, 2011, when I listed my UFOs:


Now I can concentrate on actually working on my projects. At this point, the list includes (in no particular order):

           1.   The art gallery that I started at Camp Mini Ha Ha 2009
2. My Christmas shop (have a good start on that one)
3. Victorian style parlour
4. Lady’s bedroom
6. A Secret Garden
7. Travel trailer – still in the box
8. Wire my Bombay house
9. Oriental room
10. Log cabin (I’d give up on this one but I’ve got too many things to go in it!)
11. My English dollhouse – just needs a few repairs and furnishing but there are design problems with it.
12. The wharf and beach that should be the base for my Serendipity Shop(another Camp Mini Ha Ha project - 2008).

Oh, my goodness, it's even worse than I thought!

Actually it was worse than that as there are other projects that should have been on the list such as the Three Bears House in the Russian Breadbox and the 1:24 scale hotel lobby and boutique by Adrian and Elizabeth (my CMHH auction win) that needs to be filled..

Nineteen months later, I have finished:

1. The art gallery: totally different roombox than originally planned...but it's finished!
5. 1940s detective's office above a bar (this was in fact two rooms - and I'm SO proud of both of them!
8. The Bombay house is totally wired! Still have several things I want to do with it (frame the windows on the inside, remodel the kitchen, add the patio and hot tub, and add a window seat in the office area.)

The Christmas shop is in exactly the same position it was at that time except that I've collected WAY more stuff to go in it.

Plus, I did six other projects that hadn't been on my list:

1. the scrapbooking room for a silent auction for the Glenora Child Care Society
  • ice cream booth
  • St. Albert Public Library stall
  • Petal Pushers plant stall
6. The home gym (had forgotten about this one)

AND I added Vern's memory attic to the list!

So, all in all, I guess it was a much more productive time than I had originally thought!

BUT, if you've stuck with me through this long litany, you're probably wondering why the subject is OH, NOOOOOO!!!!

Recently, Connie Sauve posted a link on The Camp to the most incredible Quilt Shop. Then Deb Laue of Dragonfly International posted pictures of the quilt shop she had made for  her sister

My DS Carol is a quilter who does incredible work not only for family but also quilts for Mexican orphanages. 

I sent her the links to both those miniature quilt shops and she was very impressed!

You may recall that I bought the Cerveny shop from Alex at Miniland. Originally it was to be the art gallery but that didn't work out so it has just been sitting waiting for a project. Then a couple of days ago I bought some chicken breasts at Costco. They were in a large 1/8" thick styrofoam container that can be cut into a wonderful number of boards that pieces of fabric can be wrapped around for a fabric/quilt shop. A sign, perhaps? that this is meant to be?

SO.....I think that one of my next projects may just well be a quilt shop for Carol......

I've already given her one mini piece - the Camping scene - but I think she would like this one too.

My immediate family consists of my son and DIL, their two beautiful children, my daughter and her SO, my mother and three sisters.

DS Sean and his lovely wife aren't into miniatures but I'm making Vern's miniature attic for their children, Jonah and Holly. DD Leanne (and Sean) gave me the kit for the Arthur when they were 4 and 6...that is now Leanne's Christmas house.

I made a memory box for Mom for her 79th birthday...10 1/2 years ago.

For DS Marie, I recreated some parts of her RL home as a birthday gift for her. And I told you above about the camping scene for Carol.

Shirley has always said that she doesn't have a place for a miniature so I haven't yet found anything to do for her.

But I have something in mind :-) ....

Friday, December 14, 2012

Check out your Christmas cards...

Some Christmas cards (and envelope linings) have great mini possibilities. The envelope from the card from my sister Carol has a beautiful gold foil lining that I know I can use at some point!

These two cards are from miniaturists but there are so many others that may have possibilities.

At the MEE Christmas party, member Teena gave us these cards with incredible  holographic scenes on them (plus some wonderful book and magazine printies).

I wish there was some way to show the card as I see it. Not only do the trees and houses appear in 3-D, Santa and his sleigh appear to move across the sky.


And dear friend Joanne gave me this card...the Christmas scene in red is all cut out and separate from the snowflake background.


The cards make me want to make a couple Christmas room boxes just so I can use them. LOL

This is a room box that I made for my mother many Christmases ago. A major feature in it is a false wall about 1" in from the back of the box so the scene through the picture window appears to be in the distance. You can't tell from the picture (because of the reflection) but it looks like there is a forest of snow-covered trees outside the window.


If I could take this apart, I would either (1) replace the original scene behind the window with the holographic picture, or (2) cut out Santa and his sleigh from Joanne's card and have them flying over the snow-covered trees.

Received the cutest card from Barb S. today. Enclosed were two wonderful tiny (3/16") laser cut ornaments that will go in the Christmas shop. (I won't even try to photograph them for you.)

But the verse in it was one of the nicest I've seen:

May your holidays be wrapped in
happiness and trimmed with the love
of family and friends.


Thursday, December 13, 2012

Afghan for attic finished!

The afghan is finally finished! Well, the actually knitting was finished a couple weeks ago but had loose threads hanging from where I changed colours and didn't get that cleaned up until just minutes ago.

I was going to block it then thought that would be kind of silly since it will end up being draped over the chair that I haven't made yet. VBG


Wednesday, December 12, 2012

Paint for Joy!

Joanne and I went to Paint for Joy! in St. Albert yesterday. She had been there before but it was my first visit! I have NEVER seen such a selection of acrylic paints in my life.

From the website:

Full range of Supplies for many different mediums: Oils, Acrylics, Watercolours, Coloured Pencil, Pen & Ink, etc. General painting supplies such as transfer papers, palette paper, wet palettes, erasers, wash basins, palette knives & much more! We have books, patterns and magazines for your education and inspiration . Hundreds of ready to finish wood items for all your creative ideas!

MEE member Carol K. has been singing the praises of Cottage Paint so was nice to see that this is one of the many products Paint for Joy! carries. "This is a multi-dimensional paint that can be used thickly, washed, crackled, stippled, overlaid and rubbed through." "No sanding, stripping or priming!"

BTW, there is a nice little restaurant next door (we didn't try it but have heard rave reviews) so nice place for a 'field trip'.

The clerk was most helpful and informative. She showed us a three dimensional technique that we could see has some miniature possibilities but since neither of us had a camera along will be going back and telling you more about that later.

RL TIP: When using clear packing tape, rather than folding over a bit of the tape to keep the end of the tape accessible, use the plastic clip from a loaf of bread to prevent the end of the tape from sticking to the roll.


Monday, December 10, 2012

totally off-topic

Last night at this time the temperature was -25C - now it's only -5C. Looks like the forecast was right - we'll have a couple warm days before the temperature drops once again. So hopefully I'll be able to get out for my haircut and some other errands.

I got my "Nuts and Bolts" made for the Christmas snack.


Preheat oven to 275 F.

one 350 g box of Crispix
one 350 g box of Cheerios
150 – 200 g stick pretzels
Couple cups of peanuts (or mixed nuts)

Mix these ingredients together in a large roasting pan.

Sauce:
½ cup (one square) margarine, melted
2 tbsp. Worcestershire sauce
2 tsp. garlic salt or 1 tsp. garlic powder
Tabasco sauce (about 4 or 5 drops)

Mix together well, making sure the garlic salt or power is completely dissolved.

Pour over the cereal/pretzel/nut mixture and stir well.

Bake for 30 minutes at 275F, stirring well every ten minutes.

Options:

If you can’t find Crispix, you can use Shreddies but they tend to soak up the ‘sauce’ so I prefer the Crispix.

If there are peanut allergies, you can skip the nuts or substitute cashews.

If you don’t like pretzels, you can skip them and add more peanuts.

Sunday, December 9, 2012

my gift received at the MEE Christmas party

I didn't show you earlier the gift I received at the MEE Christmas party. (long story)

The gifts are on the table and we're all assigned numbers. As our numbers are called, we go up and pick our choice from the gifts.

Mine was from Wendy and it couldn't have been more perfect! If you've followed me for any length of time, you know how much I love black lacquer.

It's a miniature Christmas scene in a black lacquer box with glass sides and top.

6" x 6" x 5 4/5" high
Isn't it gorgeous! But it gets even better!

It's a music box that plays "Jingle Bells" AND the section in the middle rotates as the music plays!


Music, motion, AND black lacquer - it doesn't get much better than that!

Thanks, Wendy.

Why it takes so long to clean my workroom


I wrote this several years ago but it's still all too true so I thought I'd post it here. Hopefully it'll put a smile on your face....

I've shared my problem with Age Activated Attention Deficit Disorder with many of you in the past. It’s always a problem but it attacks in major proportions when it comes to cleaning my workroom as evidenced by this morning’s efforts………

No sense putting away the green paint until I've painted enough toothpicks for flower stems for Leanne's students Mother's Day cards project. Then of course have to wash the brush.

Glue and glittering top coat from Michael's need to be put away. (Heck, I only bought them 10 days ago.) But since I haven't tried the new top coat, decide to do that before I put it in the paint rack. No loose vases out so unpack 10 more from the box from John Parker. Have to dig out the rest of my paint brushes from my tool box. At least I haven't put away the green paint yet.

I use pop bottle caps to hold paint but the new supply on my desk still contains the liners (which I save to make plates) so those have to be removed before I can use the bottle caps. Then I have to find a Ziploc bag for the liners.

Paint the vase and wash the brush.

While the painted vase is drying, I can put a few things away. Now should that bag of scissors go with the scissors on the pegboard or back into my toolbox? Toolbox I guess. While I'm at it, I better get the pair of scissors from my purse and put that one on the pegboard.

The Tacky glue and the new bottle of Ultimate need to go in my glue holder – as opposed to the glue shelf. That bottle of rubber cement – and the one on the other table – go on the glue shelf.

Pencils in the pencil can, black markers in their can. The two Ziplocs of picture frames back on the Art bulletin board. Pin vise and bits. Oops, the bits are there but not the drill. Better leave that for now. But two more pair of tweezers. And another bag of John Parker vases!

And there are the men's slip-on shoes and runners that I primed – ready to paint – but I went in a different direction and don't need them now – so back into Ziplocs and on to the Clothing board. Now where the heck are my pushpins. Ah, there they are on the end of the other table. Grab a handful, the frames, shoes, pop cap liners and some mini food that was given to me. Oh, and those sequin pins need to be put away.

On the way to put the tweezers away, I look down into a box top and there's my pin vise. Take the bit out, put it away, and put them both in the parts cabinet on my work table – you know, in the drawer marked pin vise?!?

Paint the top coat on the vase. Wash the brush and (be prepared for a shock) PUT IT AWAY – where it belongs!

The toothpicks I painted green are dry. Now the oasis I used to hold them can go into my landscaping drawer. I need a box for all the materials for the Mother's Day cards so I'll unpack my order from Staples. That box should be the right size. Put the ink cartridges on the pegboard, the Loctite Super Glue on the glue shelf and the Scotch tape in the desk drawer. File the packing slip. Oh, better leave that out for now...need to check something before its filed.

The foamcore “cards” are now in the box along with the box of foam flower pot and flowers and the Ziploc of painted toothpicks. Add a bag of pizza props to the box and put away the rest of them. May as well print out the front and back pieces while I'm at it. Now the whole box can go into the dining room to await the "carpets" and the chair kits.

Now the new "glittering top coat" is dry on my vase. How disappointing! This product (DecoArt Star Lite topcoat – soft glittering top coat from Michael's) has a matte finish. I've been using Delta Ceramcoat Sparkle Glaze and just love the iridescent finish it gives John Parker's vases. But I'm just about out of it and have been unable to find any locally so I was hoping the Deco Art would take its place. I'll have to do some major experimenting. Maybe a coat of J. W. etc.'s clear gloss varnish will give me the finish I've been getting from the Sparkle Glaze.

Doesn't sound like much but I can see whole areas of my desk top – and that's a major improvement! Now my so-called work table - that's a whole other story.

Friday, December 7, 2012

more shopping

You'll find it hard to believe since this is the second shopping report in a week but Joanne and I don't really go out shopping that much!

I did forget to tell you about one thing we saw at WalMart on our last shopping trip (when my camera died!). In the toy department, we found the most incredibly detailed 1:12 scale bicycle for $6 or $7. Didn't buy it since I think I still have one in my stash from years ago.

Yesterday, we went to the Michael's on 137th Avenue in Edmonton. Both Joanne and I needed some basswood and there were a couple other things she wanted to pick up. As we were looking through the basswood (which was actually on sale - not by much but on sale), we discovered some basswood by Midwest as opposed to that terrible stuff from Revell. Couldn't find out from the staff, however, if it was old stock or if they are finally going to start stocking Midwest again.

For those of you to whom this is important, you now get AirMiles at Michael's.

We also stopped in at Winners where they had a great selection of papier mache books at very good prices. I was sorely tempted by a large book for $5.99. The depth was good for a miniature scene but it was about 12" tall and, of course, I don't need another project! Then I spotted this book. The inner measurements are 5" wide x 8" tall and 2" deep. (And the inside is plain so doesn't need to be re-papered.)


And it was only $3.99! My first thought was maybe a picture of shelves of toys on the back wall with a Santa checking his list (I know I've seen one around) in front of it...Or maybe a Christmas baking prep table...Or a chair and Christmas wrapping table...

So many possibilities. Would make a nice gift that could be kept on a bookshelf between seasons.

Before we went for dinner at Swiss Chalet, we made a last stop at St. Albert Dollarama where I found one great mini supply and one double use item!

Now this is a great mini-find: pack of 24 pieces of 18” white cloth covered 26 gauge wire for $1.00
Could easily be recoloured green with a permanent marker.

I bought two packs of these flexible cutting mats as stocking stuffers ($2 each). BUT I may end up keeping one for myself to put in my mini tool kit. They have a non-slip bottom, won't damage a knife blade, and dried glue/paint can be peeled off them.


We couldn't find the small stir sticks that I had used for the rolls of scotch tape but even before I had a chance to suggest it, Karen suggested that sucker/lollipop sticks might be a substitute and that's a very good idea.

Just FYI, it's -16C here (0F) but right now, there's no wind so we don't have to deal with windchill! For now, at least!


MEE Christmas party

We held our Christmas party on Tuesday night.

Some before dinner visiting:


We used to do a potluck dinner, then had it catered by the church women for a couple years, but last year we switched to bringing appetizers and deserts.

And that wasn't even all the food! There was more food on the counter and a separate table with deserts! One of the favourite foods when we have a potluck is a potato dish called Schwartzie's potatoes - so Sunni, bless her heart, made up two mini cupcake trays of Schwartzie's!!
So many choices!

Each member is encouraged to bring three miniature Christmas ornaments and enter her name in a draw. The club supplies two Christmas trees. Two names are drawn and each winner gets a tree and half the ornaments.


We also have a gift exchange (retail value of $10.00). Bring a gift, get a gift.

This wonderful Christmas shop was made and displayed by Lorry S.

I only managed to get pictures of some of the gifts and they don't show up well against the Christmas tablecloths.

 My friend and upstairs neighbour got the Christmas wrap coffee table that she had watched me make on Saturday - LOL she chose it because she thought her granddaughter would like the box it was it!

Erika B. made this wonderful Christmas baking prep table:

Joanne R. received these lovely pieces from Barb S.: a beautiful Christmas lantern and the set of Christmas trees.

Bev P-M made this wonderful table decorated for Christmas:

Carol K. petitpointed the tea cosy for the teapot:

Great little bird house - even decorated for Christmas!

My friend and upstairs neighbour Barb knit this beautiful afghan in the blanket chest. Her first piece of mini knitting - just gorgeous!

Joanne made this terrific Christmas prep table - even down to the "Christmas for Dummies" book!

Sorry, I don't know who made the glitter house.

Tina MacD made this lovely hanging lamp. She's going to be teaching us how to make the lampshade in the new year.

Every year the highlight of our evening is Joanne reading a Christmas book.

Monday, December 3, 2012

A little shopping trip...

Joanne phoned this morning to see if I wanted to go out shopping with her. We stopped at WalMart just to look around. On the way there, we were discussing a mini snowman project Joanne had been thinking about. And, lo and behold, the first thing we spotted was a set of six absolutely adorable snowmen!

Then we hit the scrapbooking aisle and found an adorable set of pajamas (and a couple pillows) in the Jolee's stickers. I had been so pleased that I thought to take along my camera - until I went to take a picture of them and discovered the batteries were dead. :-(

Checked out the Christmas decor and I lucked out finding two 9" Christmas trees for $3.96 each.


When I was still working and doing three or four Christmas vignettes a year, I used to find the 6" versions of these at Canadian Tire but haven't seen them there for several  years. (I know Michael's carries them but at about double the price they were at CT.)

I remove the garland by heating it with a hair dryer and replacing it with something smaller. Then I glue ornaments on and (sometimes) replace the tree topper. Like this...


The angel topper is crocheted by MEE club member, Rosalle, who sells them at our annual Show and Sale. She also makes them in silver and gold. They're gorgeous!

Joanne got several little (about 1 1/2" tall) 'snow' covered bottle brush round bushes (75 cents each) for the snowman project and some great bare birch trees about 4 to 5" tall ($3 each?) that will be wonderful next to a 1:48 house.

Getting in a Christmas mood - mini-wise

There are two advent calendars dedicated to miniatures available on the internet.

Artisans in Miniature have their 2012 advent calendar up online. Behind each door is a tutorial with a Christmas theme.

The mini treasures wiki has its 2012 advent calendar up also. This is the fourth annual advent calendar on the wiki. Full of all kinds of eye candy.

Hope you'll take a look at them and enjoy!

Sunday, December 2, 2012

Mitre Box - a bit more

We had some great things mentioned in the comments there...

I had forgotten this little tip....


When you are sawing a piece of wood in your mitre box, you can hold it in place with a piece/or two of Lego.


Saturday, December 1, 2012

What a productive day!! - in SO many ways!

What a great day!

Started off by being in the group that decorates the building for Christmas. We put up and decorated a total of five trees - looking good!

At 11, Barb came down and we popped the lasagna she brought into the oven and I finished making the salad for lunch. Joanne was doing a children's program until 11:30 so we knew she wouldn't arrive until later.

Barb started making the stones from Crayola magic clay and attaching them to the chimney of her attic that we're doing as the MEE annual project.

In the meantime, I started work on my MEE Christmas gift. No big surprise that I decided to do the  Christmas wrapping coffee table!

I started with this coffee table from Dollarama. It's 1 1/2" high and the top is about 4 1/3" x 2 1/2". I first used a sanding block on the top to remove any varnish and the worst of the red.

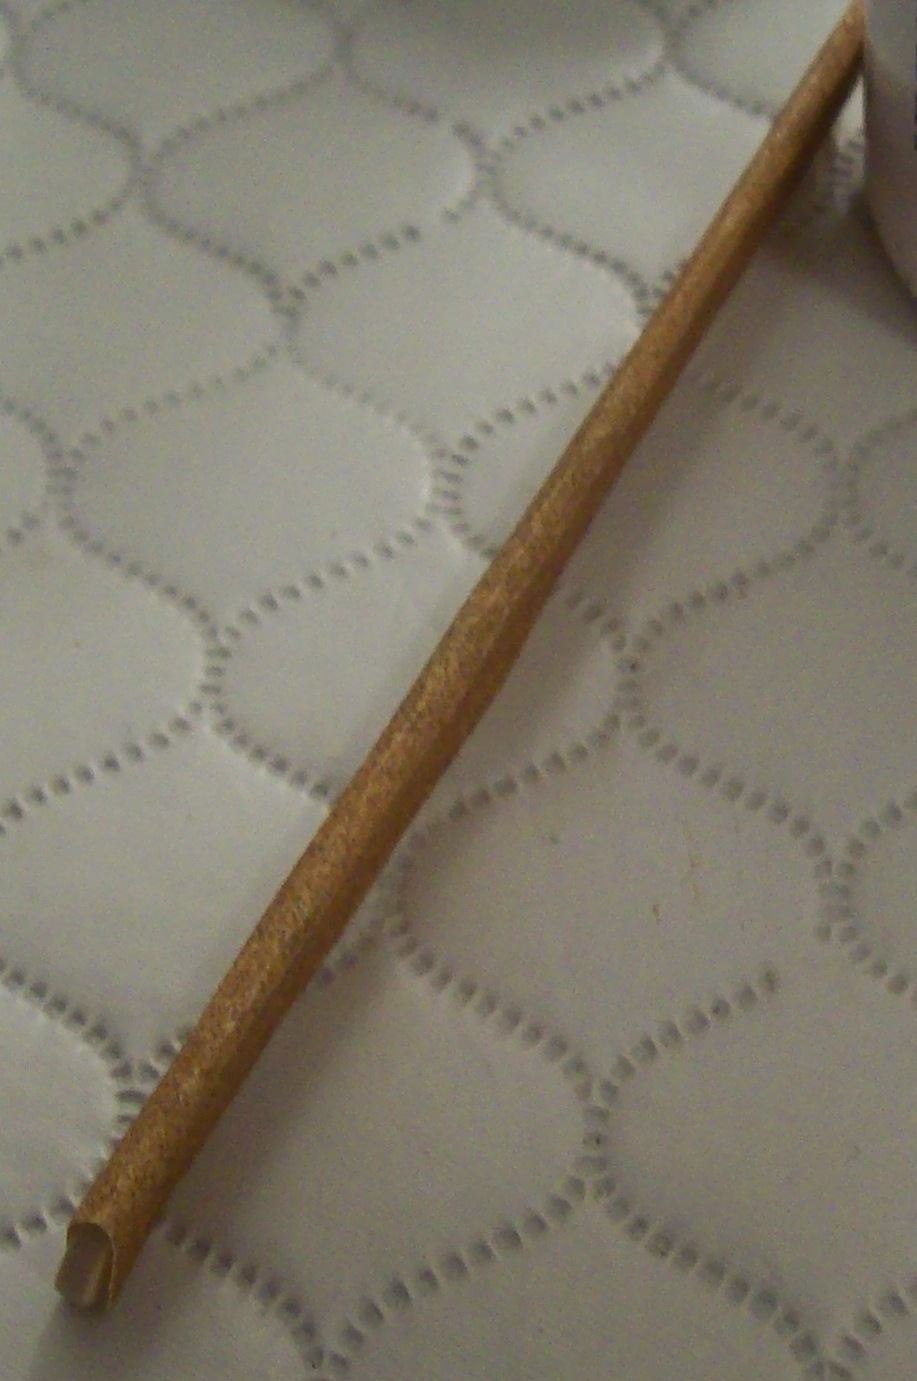
When it comes to sanding the table skirt, legs, and bottom of the table, a sanding stick works best . I made this one by gluing a piece of sandpaper around a popsicle stick.

 It works well on all the narrow pieces and most of the nooks and crannies.

For sanding the cheap red furniture, I drape a  towel over my lap and sand over that and use the towel for catching the stain/varnish and wiping the furniture as I go.
Sanding this stuff really makes a mess as I've learned from past experience - that's why I use the towel.. (This is what the towel looked like at the end. VBG)

Got most of the finish off.
 My original plan was to stain the table a dark brown so it could replace a coffee table in a regular dollhouse living room with a Christmas coffee table.

(Working on the bottom so any mistakes are not so obvious.)

First tried the dark stain pen from Dollarama...just didn't work. So then I tried the red mahogany Minwax stain pen - Neither of them worked! Just didn't cover/or look good.

So I went back to my tried and true permanent black marker (just a Staples chisel point permanent black that I buy by the dozen).

When you're 'painting' with the black marker, the order in which you do it doesn't matter a great deal as the marker dries so quickly. After the marker dried, I sanded the table with a piece of brown paper. Then I covered it with a coat of Americana DuraClear satin finish.

Here the order does make a difference! Holding the table upside down by the edge of the top, varnish the legs and the entire under side of the table...

Then you can set the table down and varnish the table top and its edges. Then just leave it to dry! I ended up giving it two coats of varnish but that's a subjective choice.

Now to put on the gift wrapping accessories:

This is the WOW factor! Reasonably easy, it's barely noticeable but for miniaturists and mini-muggles alike, when they spot it, it's "Oh, my, is that really real?" and "How did you do that?"

That's the mini roll of Scotch tape!

Dollarama sells hollow white plastic stir sticks that are 1/16" in diameter and about 4 inches long. You can see short pieces of them in the top of the picture.

You take a piece of the stir stick and wrap about 7 - 8" of RL Scotch tape around it. The really tough part is keeping the tape lined up straight as you wrap it around the stick. (If you get a bit off track, don't worry too much as you can trim off that part.) When you get to the end of the RL tape, tape a piece of red plastic or paper across it. Trim that red end piece down to about 1/16"


Take that strip of tape on the stir stick and slice it into pieces about 1/16" or 1/8" wide with a straight blade. That will give you 8 or 9 rolls of 'real' miniature scotch tape.


While you've made the scotch tape, the finish on the table has been drying.

Now you can decorate it!

This is the finished table. The rolls of wrapping paper are printies from Jennifer wrapped around the same small stir sticks above. The bow is one I bought at a show in Kelowna but Lorry in our club makes them and I know the instructions are online somewhere (I'll find and post the instuctions); the cards are from Jim Collins; the pen is a round toothpick painted red with a silver tip and the cap and clip in gold (pilot pen). A Chrynsbon bowl with Christmas candies from Belara Beach; (glass of water)  a red glass stain bottle top with dried clear varnish; (second row) commercial box with pieces of tissue paper (a gift from Dale at Petite Images in Ontario); strips of gold paper as packaged ribbon; prewrapped box (from Dollarama): silver candlesticks (Chrysnbon painted with nail polish); metal scissors with handles painted with red nail polish (from Grandpa's Dollhouse): and the Scotch tape!

Those are commercial scissors from Grandpa's Dollhouse but you can make your own:


SCISSORS: Straighten out and flatten one end of each of two sewing hooks. Glue together and paint the handles with coloured nail polish for a pair of scissors.

These look best in a container on a desk but they do look amazingly good in a scene.

The finished table:


Then cleaned up and put up my own Christmas tree - so Mom could see it across the parking lot:


Was a WONDERFUL Day!!!