There's a great meme out there with a woman who has work to do - then "look - there's a book"! I can't find it to stick in here but it's what happened today.
As a board member, I had to watch the door today while a contractor kept it open while he did his work. So I had to get a book from the 20 or so under my coffee table to read while I did that.
Grabbed "One Thousand White Women: The Journals of May Dodd" by Jim Fergus. The author's note at the beginning says: "In spite of efforts to convince the reader to the contrary, this book is entirely a work of fiction." Well, the author did convince me to the contrary and I just felt so incredibly involved in these women's lives that I couldn't put the book down until well after the deadline for posting on the blog for today. The attitudes toward women, Native Americans and African Americans at the time (1875-76) are very well written.
Tuesday, May 31, 2016

Sunday, May 29, 2016
a tri-fold screen
The floor will come later.
Tina made this tri-fold screen kit for me on her laser cutter.
Black and gold are my favourite colours so that's where I went with this also.
For the 'gold', I used two separate Pilot pens (available from Staples.com). And for the black I used a black permanent marker.

Here are six of the nine panels that comprise the screens.

The panel on the left hasn't been painted yet. The centre panel outside and edges have been done in black and the filigree in the middle has been done in gold. The right hand panel has been done in gold with the inner and outside edges done in black.

And here it is tentatively put together.

Now all of the pieces have been 'painted'


The first panel glued and clamped.
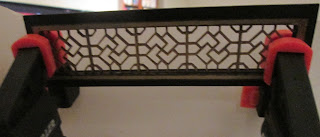
All three panels finished.

Now the problem is to hinge the panels together somehow....and what a problem it is!
Have to give this a LOT of thought. I have a supply of Houseworks hinges in my stash but I think they're too wide. Somewhere I have some Tyvek (that strong plastic material that some mailing envelopes are made from) that might do the trick. We'll see.
Tina made this tri-fold screen kit for me on her laser cutter.
Black and gold are my favourite colours so that's where I went with this also.
For the 'gold', I used two separate Pilot pens (available from Staples.com). And for the black I used a black permanent marker.

Here are six of the nine panels that comprise the screens.

The panel on the left hasn't been painted yet. The centre panel outside and edges have been done in black and the filigree in the middle has been done in gold. The right hand panel has been done in gold with the inner and outside edges done in black.

And here it is tentatively put together.

Now all of the pieces have been 'painted'


The first panel glued and clamped.

All three panels finished.

Now the problem is to hinge the panels together somehow....and what a problem it is!
Have to give this a LOT of thought. I have a supply of Houseworks hinges in my stash but I think they're too wide. Somewhere I have some Tyvek (that strong plastic material that some mailing envelopes are made from) that might do the trick. We'll see.
The lamp roombox
This is such a great little room box that I don't know if I'll add the lamp to it.
These base, top and front frame are already put together. Everything needs to be painted before I assemble it.

First and second coats of paint

Have glued the insert together. This is removeable so you can make different inserts and switch them around.

Now that everything has two coats of paint, it's time to put it together. These Lego block squares ensure that the back wall is centered.

The plexiglass is put in place then the top pieces are glued in place.
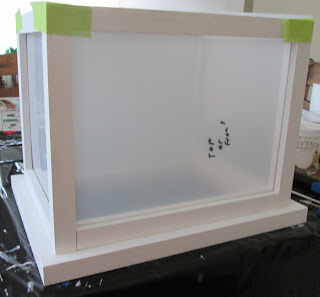

Once the glue dried, I gave the entire thing a coating of no gloss varnish that matches the paint.


Love this part - peeling off the protective plastic from the plexiglass! Just lightly cut through the protective layer and peel it off. The part that is in the frame pulls out too.


Now the insert has been added.

And the lid is put on.
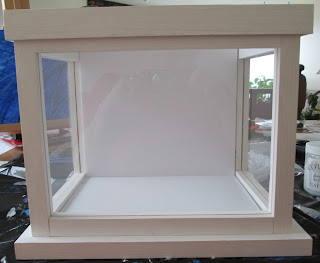
Next I started work on the floor of the insert.
These base, top and front frame are already put together. Everything needs to be painted before I assemble it.

First and second coats of paint

Have glued the insert together. This is removeable so you can make different inserts and switch them around.

Now that everything has two coats of paint, it's time to put it together. These Lego block squares ensure that the back wall is centered.

The plexiglass is put in place then the top pieces are glued in place.


Once the glue dried, I gave the entire thing a coating of no gloss varnish that matches the paint.


Love this part - peeling off the protective plastic from the plexiglass! Just lightly cut through the protective layer and peel it off. The part that is in the frame pulls out too.


Now the insert has been added.

And the lid is put on.

Friday, May 27, 2016
Really off topic - Highwaymen and Willie Nelson
One of the benefits of being home was having my own TV channels. Sounds silly but I know what channels I expect things to be on as opposed to the 2000 channels on the Bell satellite the kids have. (Although I had made my own little list of some of my favourites.)
I'm sure I would have missed these two PBS shows otherwise.
First was a one hour show on "The Highwaymen" (Willie, Waylon, John and Kris). The songs brought back SO many memories that I laughed, cried and remembered our Mould family reunion in Rose Lake, BC, I had phoned Mom to tell her about this. She hadn't thought to watch it originally but it brought back the same memories for her.
After that, PBS aired the award of the Gershwin Prize for Popular Song to Willie Nelson. Definitely a 5 star show! Great music!
I'm sure I would have missed these two PBS shows otherwise.
First was a one hour show on "The Highwaymen" (Willie, Waylon, John and Kris). The songs brought back SO many memories that I laughed, cried and remembered our Mould family reunion in Rose Lake, BC, I had phoned Mom to tell her about this. She hadn't thought to watch it originally but it brought back the same memories for her.
After that, PBS aired the award of the Gershwin Prize for Popular Song to Willie Nelson. Definitely a 5 star show! Great music!
I'M HOME!!!!
And it feels so good....
Leanne and Rob came home a day or two early. They had two bouts of really expensive car repairs and the trip didn't turn out the way they had hoped and planned.
While it's hard being away from my 'stuff', it's really not that bad staying at their place. And, of course, I have Columbus to keep me company.


I worked mostly upstairs at the dining room table as the light is really bad downstairs...but I'm used to listening to the TV while I'm mini-ing. Fortunately, Leanne had had me download Shaw's TV app onto my tablet so I could watch that.
Didn't get a great deal done but took lots of pictures so I'll catch you up on what I did do over the next couple days.
One huge disappointment was that I couldn't access my blog to update it as I went along. Plus I took the wrong cord so couldn't download my pictures.
June picked me up to go to our mini general meeting Tuesday before last. Good meeting! A co-worker had given Joanne a trunkful of matboard so after the meeting we all trooped out and took what we needed/wanted from her trunk. She kept my choices for me so I'll get them soon.
Then this past Wednesday Judi came by and picked me up for lunch. Had a wonderful visit with her!
That's it for now. Have to edit my pictures.
Leanne and Rob came home a day or two early. They had two bouts of really expensive car repairs and the trip didn't turn out the way they had hoped and planned.
While it's hard being away from my 'stuff', it's really not that bad staying at their place. And, of course, I have Columbus to keep me company.


 |
| He watches TV with me. |
Didn't get a great deal done but took lots of pictures so I'll catch you up on what I did do over the next couple days.
One huge disappointment was that I couldn't access my blog to update it as I went along. Plus I took the wrong cord so couldn't download my pictures.
June picked me up to go to our mini general meeting Tuesday before last. Good meeting! A co-worker had given Joanne a trunkful of matboard so after the meeting we all trooped out and took what we needed/wanted from her trunk. She kept my choices for me so I'll get them soon.
Then this past Wednesday Judi came by and picked me up for lunch. Had a wonderful visit with her!
That's it for now. Have to edit my pictures.
Sunday, May 8, 2016
Floor lamp
I got the floor lamp made! And I'm quite pleased with it.
You may recall that I had this headband left from making the bath surround in the Bombay house
 and this piece of square stripwood in my stash.
 I cut four 4" pieces of the stripwood and trimmed the edge off one side on each piece.
 Then I glued two pieces together with the trimmed edge of each piece in the middle. (This will form the channel for the wires for the light.
 Then I glued those two pieces together and clamped them. You can see the hole down the middle of the pedestal.

Sorry. This is where my camera ate some pictures.
Once the glue was dry, I 'painted' the entire piece with a black marker then glued 4" x two strips of the headband on all four sides of the pedestal.
The top of the hole down the centre wasn't quite large enough for the base of the harp so I drilled down about 1/4" with my jeweller's drill and put the harp in place then fed the wires of the LED light down through the pedestal.
The problem with the bottom of any lamp is that you have to leave a space for the wiring to go out at right angles. As thin as the wires are, if they go out under the lamp, they throw it off-balance. (If your base is a filigree finding, you can simply feed the wires through a hole in the filigree.)
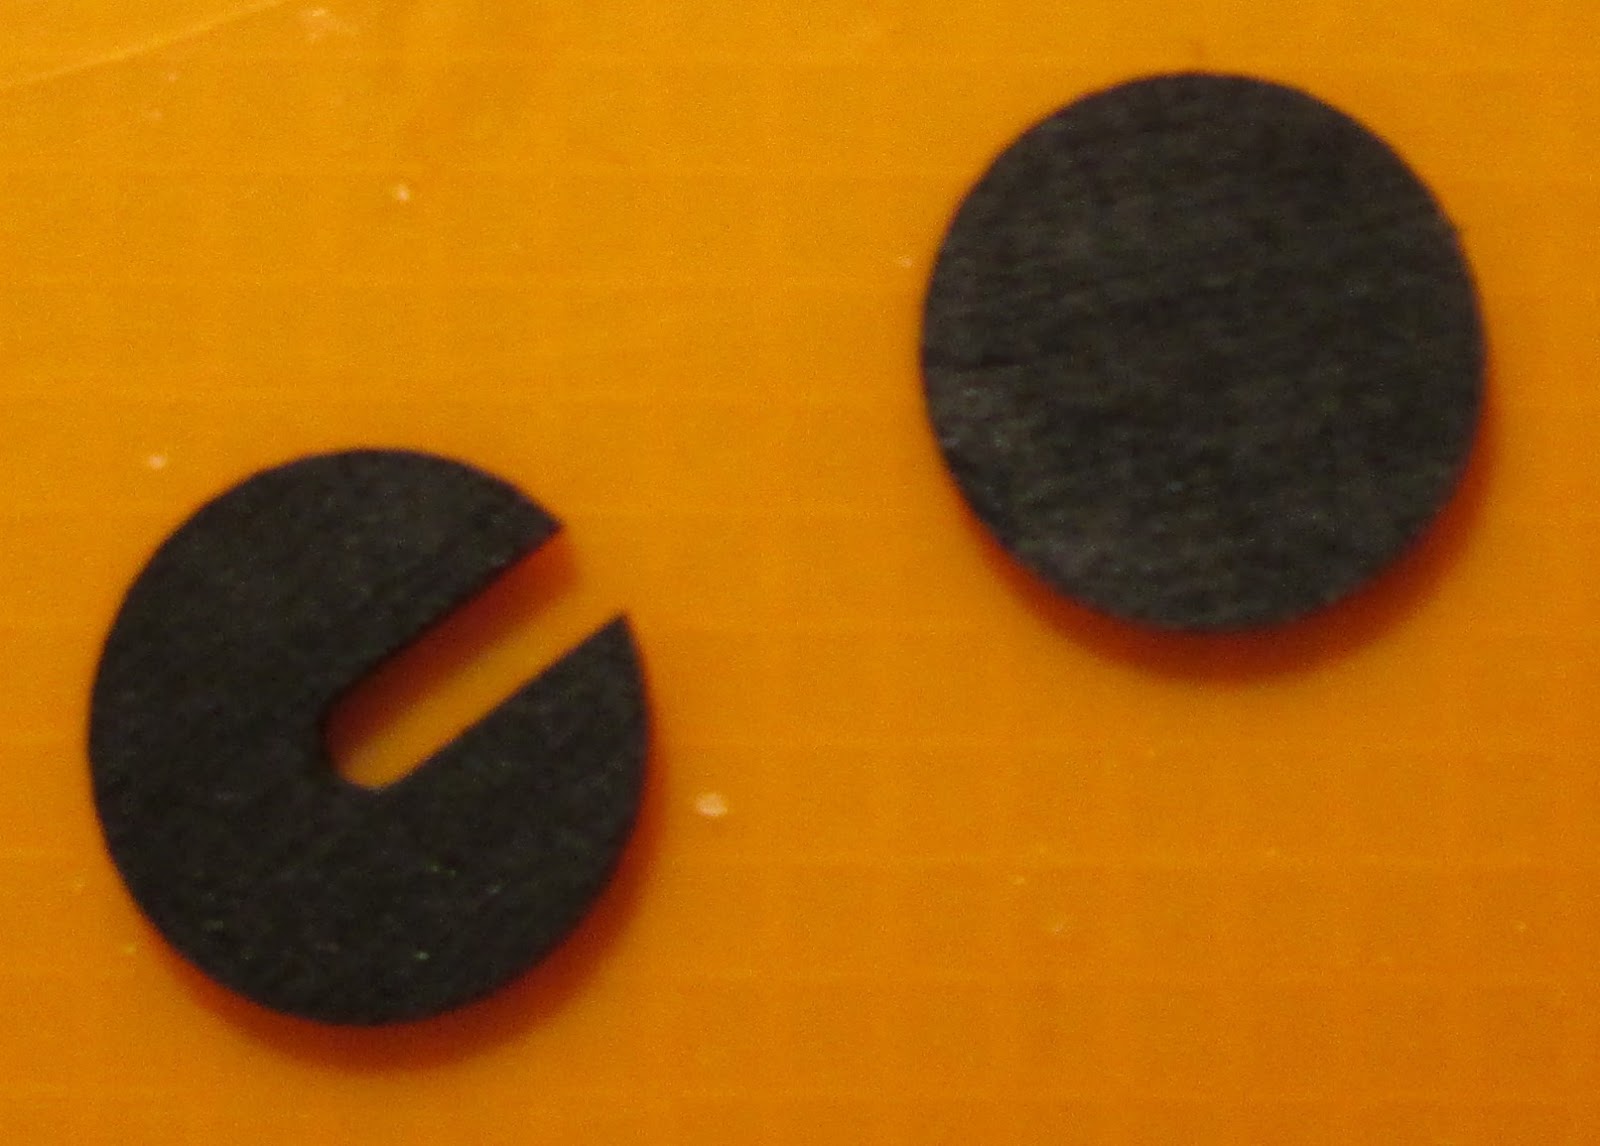
But Tina, bless her heart, cut (on her wonderful new laser cutter) a whole pile of pieces to get around this. She made them in three sizes (for floor lamps, table lamps and 1:48 scale). One has a cutout for the wire to feed through and the other is solid. Even these can be stacked to make a base for a table lamp using a combination of the sizes.
Anyway I 'painted' these also with black marker
 then glued them together
 and glued them to the base of the lamp.
Here I've attached the shade support to the harp
Hint: Hold the nut between your fingers and screw the harp (with support) into it.
Then add the shade.

Here is the lamp with the bulb lit temporarily.
Even though I used one of the larger LED bulbs in this, I'm not terribly pleased with the amount of light. I may have to think about making a vellum shade to replace the plastic shade that comes with the harp.
Once the lamp is in place in a scene, I will permanently attach the battery pack and switch where the switch can be reached conveniently.
I'm now thinking about how I can make a matching table lamp with a proportionately smaller pedestal. I certainly have enough of the headband but it's a matter of making a base for it with what wood I have.
Feeling a bit down....it took about three hours to make the lamp (including drying time - pictures and all those other things) then about 1 1/2 hours to write the blog. (And that was without the pictures of major parts of the project.)
Don't get me wrong. I love sharing and I love your support. But sometimes it just gets so frustrating in terms of time.
Don't mind me, just feeling sorry for myself. I'll get it together soon.
You may recall that I had this headband left from making the bath surround in the Bombay house


Sorry. This is where my camera ate some pictures.
Once the glue was dry, I 'painted' the entire piece with a black marker then glued 4" x two strips of the headband on all four sides of the pedestal.
The top of the hole down the centre wasn't quite large enough for the base of the harp so I drilled down about 1/4" with my jeweller's drill and put the harp in place then fed the wires of the LED light down through the pedestal.
 |
| The red is from the reflection of my shirt. All the beading is actually gold. |
The problem with the bottom of any lamp is that you have to leave a space for the wiring to go out at right angles. As thin as the wires are, if they go out under the lamp, they throw it off-balance. (If your base is a filigree finding, you can simply feed the wires through a hole in the filigree.)
But Tina, bless her heart, cut (on her wonderful new laser cutter) a whole pile of pieces to get around this. She made them in three sizes (for floor lamps, table lamps and 1:48 scale). One has a cutout for the wire to feed through and the other is solid. Even these can be stacked to make a base for a table lamp using a combination of the sizes.
Anyway I 'painted' these also with black marker

Here I've attached the shade support to the harp
Hint: Hold the nut between your fingers and screw the harp (with support) into it.
Then add the shade.

Here is the lamp with the bulb lit temporarily.
 |
| It actually looks straighter in person than in the picture. |
Even though I used one of the larger LED bulbs in this, I'm not terribly pleased with the amount of light. I may have to think about making a vellum shade to replace the plastic shade that comes with the harp.
Once the lamp is in place in a scene, I will permanently attach the battery pack and switch where the switch can be reached conveniently.
I'm now thinking about how I can make a matching table lamp with a proportionately smaller pedestal. I certainly have enough of the headband but it's a matter of making a base for it with what wood I have.
Feeling a bit down....it took about three hours to make the lamp (including drying time - pictures and all those other things) then about 1 1/2 hours to write the blog. (And that was without the pictures of major parts of the project.)
Don't get me wrong. I love sharing and I love your support. But sometimes it just gets so frustrating in terms of time.
Don't mind me, just feeling sorry for myself. I'll get it together soon.
Saturday, May 7, 2016
Fort McMurray fire
I don't think many of you have any idea how big and terrible this fire is! Other than you in Nova Scotia who have seen the comparative map posted originally by Pam on Facebook which showed how far the fire would have spread if it had been in Halifax..
The Weather Network does have a map that shows the comparative area of the fire over several capital cities in Canada so you can get some idea of how large this fire is. For you in PEI, it would more than cut the island in half.
The entire population of 80,000 people has been evacuated from the city over the past week to the rest of the province that has opened its arms wholeheartedly to them.
I could not begin to tell you all the heartwarming stories and I won't even try. They are all over the newspapers and the internet.
Suffice it to say that all Canadians (from First Nations to Syrian refugees and all those in between) have joined together to support these people who have become refugees in our own country.
I am SO proud to be an Albertan...and a Canadian....
When things like this happen, we pull together and support each other.
The Weather Network does have a map that shows the comparative area of the fire over several capital cities in Canada so you can get some idea of how large this fire is. For you in PEI, it would more than cut the island in half.
The entire population of 80,000 people has been evacuated from the city over the past week to the rest of the province that has opened its arms wholeheartedly to them.
I could not begin to tell you all the heartwarming stories and I won't even try. They are all over the newspapers and the internet.
Suffice it to say that all Canadians (from First Nations to Syrian refugees and all those in between) have joined together to support these people who have become refugees in our own country.
I am SO proud to be an Albertan...and a Canadian....
When things like this happen, we pull together and support each other.
Subscribe to:
Posts (Atom)