Saturday, March 30, 2013

Mini Day Out

SHOOT!! You would think after all the times that I've had my camera and forgotten to take pictures and cursed myself for it that I would remember to take pictures....throughout the day and not just at the last minute. I get SO frustrated with myself.

Missed some great shots of the whole group and some of the beautiful attics that some people were working on. AND the incredible corsages that Janeen makes from bread clay. (Teresa took some pictures of those so I'll see if I can get them from her and post them later.)

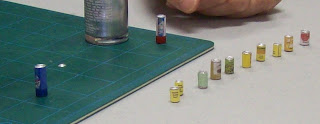
There were 15 of us throughout the day working on a variety of things. Lois's husband, Peter, was there to help with the wiring of the attic project. And I demonstrated some of the tutorials - the canned goods and bowls made with a quilling tool, the knives made from tooled toothpicks, and cakes made from corks and bottle caps.

One of Erika's bowls from quilling paper

Teresa and Lucille hard at work. Lucille was working on a kit of a  child's playhouse in 1:48.

Peter and Lois working away. Dolores's attic is in the foreground.


Trineke, Barb (busy quilling items) and Judi (checking out the T2T booklet). Joanne had brought and donated to the club a large box of quilling paper that she had inherited from a former club member who introduced her to minis. After Peter helped her with the wiring of her attic, she was sorting through the quilling paper (lower right) but she'd kill me if I added that picture...
But I can show you a view of the wonderful work she did with Crayola magic clay on the outside of her attic:


Trineke quilled all the canned goods then tried her hand at some lovely quilled bowls.

Barb R. also had a very productive day.
Tina finished the first project she had brought to work on so started working on a hydrangea in 1:48!!! OMG, I can't do flowers in 1:12 so even the idea of doing them in 1:48 boggles my mind.

At the end of the day, Trineke and I were discussing her attic and she described a piece that she needed - a wall-hung sink. I knew that the piece she wanted was available as part of a Chrysnbon kit...so we discussed Chrysbon for a while, then I remembered that I had that particular kit (bought with pieces missing) and the pieces she needed for her attic were all in that package I had. We were both SO pleased.

She hadn't been familiar with Chrysnbon so I later e-mailed her the url for a website that has the most comprehensive collection of Chrysnbon furniture and accessories that I have ever found 

I love these times we spend together.


Friday, March 29, 2013

Trash to Treasure - soaker tub

I just finished putting together a Trash to Treasure booklet for our club members who are meeting here for the Mini Day Out on Saturday...and one of the items mentioned there was...If you watch your plastic packaging, you may even find a piece that will work for a bathtub.

When Joanne and I were out yesterday and doing the rounds of Dollarama, Dollar Tree and LoSeCa, we picked up some Marie Callendar cornbread muffin mix. When we got home, I decided to try it so pulled some cupcake papers from my pantry....

And there it was:

6" long x 3" wide x 2" deep

 The packaging for the cupcake papers that I bought at Dollarama is a perfect large soaker tub!

To give it that "enamel" look all I have to do is paint the outside with white acrylic paint...and I can add 'jets' to it by gluing silver sewing snaps to the inside for jets/drains..


What are the chances?

Thursday, March 28, 2013

Some ideas for making cakes

Some of my friends are real artisans when it comes to miniature baking, especially Carolyn and Natasha. I don't have the ability or inclination or the skills with polymer clay that they do but occasionally it's nice to be able to quickly make a little cake to put in a scene. So here are some ideas that you might like to try.

From cork:

All you need is a cork, a blade, some spackle and (optional beads, glass stain, bunka for decoration)

I use a scraper blade (available at Dollarama and Canadian Tire).

Use a straight blade to slice a piece of cork about 5/8" thick. You can cut a 'slice' from it if you like.


The first cake was iced with spackle then topped with very tiny beads mixed with red glass stain. The 'cake edges' of the second cake were painted with brown paint and the rest iced with spackle.

TIP: If you push a push pin into the bottom of the cake. It makes a good handle while you're icing and decorating the cake.

Here I've taken the cherry topped cake and put it on a pop bottle cap liner and push pin that had been painted with red glass stain. The pin from the push pin goes through the liner and into the cake to hold it all together.

Other options:

Plastic pop bottle caps can also be iced with spackle for a quick cake.

You can mix a bit of acrylic paint in with the spackle for coloured icing.

Fine-grained crafting Styrofoam can be cut into rectangles for slab cakes or circles for round cakes.

¼” balsa or basswood can be cut to size for slab cakes.

Wood dowelling of various sizes can be used for round cakes also – just cut slices for the dowel to the thickness you want.

This cake was made with three slices of dowelling in three sizes. The larger two formed the bottom two layers and the smaller one for the top layer. They were all iced with a smooth layer of spackle. The trim on the layers is strips of white bunka laid into the spackle. I think for the top trim on the bottom layer I unravelled the bunka before putting it in place. Pieces of round toothpick were used to separate the top and bottom layers. When everything was completely dry and in place, I painted the entire cake with white acrylic paint.


Tuesday, March 26, 2013

bulletin boards, canned goods for pantry

Thanks so much to all of you who commented on my bulletin board storage. For those of you who have the closet space for them, I highly recommend them. For years, I used the parts storage cabinets such as these:


They're great BUT they're very labour-intensive if you want to keep them up-to-date and know exactly where things are. 

The bulletin boards (and actually they don't have to be bulletin boards - you can use the big ceiling tiles that are used in suspended ceilings) keep everything visible and readily accessible. I put labels on the outer/visible edge so I can see at a glance what's on each board.

When I want to work on a particular project, I just pull out the board/boards that  apply to that particular project and everything is handy.

The DIY of the Day:

On Thursday, I showed how to make a bowl from quilling paper. 

Today's DIY is generic cans for your pantry using the same method.


You can email me if you would like me to send you the .pdf file for these cans.


Monday, March 25, 2013

YES!!! ...plus a very short/simple tutorial

Everything is put away where it belongs.....

The dining room table is empty of minis:


Ohhh! It feels good!

Quick tutorial:

This little shelf will work almost anywhere in the house.


Cut two narrow pieces from any fancy molding, glue it at right angles to a piece of basswood and you have a nice little shelf. (This one is the depth of the molding but the shelf can be deeper.)

Sunday, March 24, 2013

Not a totally wasted weekend...

On Friday, I absolutely could not find something so I knew it was definitely time to (Oh, the horror of it all!) CLEAN MY WORKROOM.

Oh, I've tidied it up every couple months or so - especially when I have fellow miniers over but haven't done a really good clean for much too long.


No wonder I couldn't find things.

I got half done! This is what it looks like now.......


Huge improvement BUT (hanging my head in shame) that's only half the work done. (At which point I succumbed to mumblemumble of the Louise Penny books that had been calling to me.)

Most of the items that were taken from off and under the tables still have to be dealt with. (Run screaming!) 

Most of you who know/follow me are aware that I keep most of my mini accessories on bulletin boards in a closet at the end of my workroom.

Occasionally I bag new items and put them on the bulletin boards but more often I tend to hoard them then do a wholesale sort and put away. And that's what ahead of me tonight.

All the items to be bagged and put away are on the dining room table and the 20 bulletin boards are spread around waiting to be updated. My guess is that there are at least 200 items to be sorted through, bagged, and put away.


So this will be how I spend my evening...

Hopefully I'll get back to some Trash to Treasure and tutorials tomorrow.


Friday, March 22, 2013

Knives from turned toothpicks


Knives from turned toothpicks

Full toothpick, cut to knife length, one side shaved, both sides shaved, rough tip ready for shaping with emery board.
The blades are shaped roughly with an X-Acto knife just slaving the uncarved part of the toothpick (after it's been cut to desired blade length) down bit by bit on either side until it's a thin as possible then finishing the shaping with emery boards. Then the blades are painted silver with my Pilot pen and the handles stained with a Minwax stain marker or painted with nail polish.

(Step 1) Cut the round part of the toothpick off about 5/8" from the edge of the carved part. Rest the 5/8" part on the edge of a table or book (something hard and flat) and hold on to the carved part.

(Step 2) Using a new X-Acto blade, shave about four thin strips of wood as evenly as you can make them off the top of that piece (or until you're shaved away about 1/3 of the thickness of the toothpick). Don't try to take off too thick a layer at once.

(Step 3) Flip the piece over, lay the flat side against the table and do the same thing on the other side.

(Step 4) When you have the second side down to about 1/3 (or less) of its original thickness, you can take your X-Acto blade and cut off the end of the 'blade' at an angle to begin shaping the tip. 

Once that's done, you can again rest the "blade" flat side down and sand it smooth with an emery board. When both sides are smooth, take your emery board and sand across the blade one side at a time at an angle until you have an 'edge' to y our blade.

The blades are actually pretty sturdy and I've yet to break one but I have (more times than I care to think about) taken off way too much when I've been shaving the wood off. In which case I simply make a paring knife instead of a carving knife. LOL

Once you get going, you can make any length and shape blade you want.

Finishing:
1. Once the knife is completed, paint or stain the handle first. (I just finished a batch and used red nail polish to paint the handles. This way I get the colour and sheen at the same time. I've also used permanent marker and clear nail polish or gloss varnish. Or Minwax stain markers for a wooden handle. I don't advise using acrylic paint as it raises the grain of the wood and you get straggly ends. It also tends to fill in the grooves. Then stick the knife blade into floral oasis and let sit until the handle's totally dry.

2. Once dry, you can hold it by the hand while you use a silver Pilot pen to colour the blade. Then you can just put the whole thing on a sheet of wax paper until the blade is dry.


Thursday, March 21, 2013

Bowls

As with so many things that I've learned over the years, I don't always recall exactly where or from whom I learned them originally....or if it's something I thought up myself.

I'm fairly certain, however, that I first heard of this method of making bowls from Joann Swanson.

They're really quite simple to make although I still don't get the sides as smooth as I would like.

Supplies:
a slotted quilling tool (I got this one from deSerres in West Edmonton Mall. My earlier one was from Dollarama - it was plastic and came with a supply of quilling paper. Worked well for several years.)

quilling paper these are coloured strips of paper 1/8" wide by 22" long

clear nail polish (or gloss varnish)

The end of the strip of quilling paper is put through the slot of the quilling tool then the rest of the paper is wound round, keeping as tight and even as possible.


The end of the strip is lightly glued in place then the next strip if butt-joined and glued in place and the winding continued.

This bowl is made with a total of four strips.

 Then it's slipped off the tool. Put the quilled piece on a firm surface and rub it even.


Then, using your fingers, carefully shape it into a bowl

 When you're pleased with the shape, coat the inside of the bowl with clear nail polish or gloss varnish. When that has dried, coat the outside of the bowl. (I generally leave the top outside rim uncoated - just a personal preference.) You can see how the coating changes the colour of the paper.


This bowl is 13/16" in diameter and 3/8" high.

This bowl was made with three strips of three light orange strips, one dark green, one light orange, another dark green, then a final light orange (for a total of 7 strips).


Here it is finished. (It's just over 1" in diameter and 7/16" high.) I did gloss all of this one. 

As you can see, the nail polish/gloss finish changes the colour so you may want to cut a half inch or so of your paper strip before you start and coat it to see what the resulting colour will be.

Wednesday, March 20, 2013

Kitchen/Pantry items

I've recently been hosting a Second Tuesday get-together at my place. Second Tuesday refers to the fact that the club meets at the church on the first Tuesday of the month for a workshop and the third Tuesday of the month for a general meeting. Fourth Tuesday, there is a gathering at Tina's for those who work in 1:48 scale.

Second Tuesday is mainly directed at newbies and so far we have done Christmas stockings, built a table from scratch  and built a bench from a Cheryl Kerfoot kit.

At our last get-together, I suggested that we next work on kitchen/pantry items. That seemed to be a popular idea based on the few DIY examples I had shown them at the time. But the more I thought about it (and the more ideas I came up with) and with so little time between the usual Second Tuesday date of April 9 and my April 15 departure on the trip to Chicago and New York, I thought that this was something that was better suited to a Mini Day Out.

SO in place of the Second Tuesday meeting on April 9, we are having a Mini Day Out in the social room at my place on March 30.

I'll be be posting most of the kitchen/pantry item DIYs here so even if you can't join us on March 30, hopefully you'll be with us in spirit.

We'll start tomorrow with a mixing bowl made from quilling paper. And over the next couple weeks, there will be lots of Trash to Treasure and DIY for kitchens.

My 'Tiffany' lamp shades

Our club president, Tina, comes up with some of the most interesting and unique projects for us. One of her recent ones was 'Tiffany' lamp shades made from Shrinky Dink Plastic.

NOT a tutorial, unfortunately...(I'm not even sure I could manage a video to show you properly).

We started with a sheet of frosted Shrinky Dink plastic and drew our patterns on them with black pencil crayon, then coloured them with pencil crayon.

The patterns are mandelas (you can find them with an image search for mandela). Here of some of the ones that Tina found for us:


I used the two patterns on the left.(Each one is approximately 4" in diameter.

Sorry, I thought I at least had a picture of the upper left piece traced and coloured so you could see what I started with.

At least if I had had that, you'd have some idea of the process...especially if I had thought to at least take pictures of the tools used to shape the lamp shades.

The process itself happens SO quickly that I knew I wouldn't get pictures of it but I apologize for not at least taking pictures of the tools used to shape the lamp shade...wooden balls with dowels inserted for handles and, in this case, sake (Japanese rice wine) cups.

So now that I have completely confused you....

You use a heat gun to shrink down the plastic to about 1/3 to 1/4 its original size then you use tools to shape it into a lamp shade.

Here are the two lamp shades that I did:


I haven't yet decided how or where I'll use them but I'm very pleased with how they turned out.


Tuesday, March 19, 2013

Some major re-thinking to be done...

Because the wiring of the attic put me in a major stall on that project, I turned my attention to the quilt shop. (Always a good idea to have two projects going so you can switch between them...)

BUT I had envisioned the back wall of the quilt shop like this:

Fabric bolts
Pegboard with quilting tools


And displays of spools of thread, etc. on the bottom
Fabric bolts
Doors (maybe false)
Open (maybe with quilt batting)

maybe a second shelf here
Doors (maybe false)


Then I took another look at it and and my bolts of fabric and realized that it wouldn't work!

The back wall is 15" wide and I have almost 30" wide of fabric bolts so this is going to take a major re-design...

I can move the pegboard behind the sales counter...but I still need all that back wall width for the fabric bolts...where can I put the thread, etc.,?  Especially if I do a section of fat quarters...

I think I can redesign the back wall so I can put in two rows of fabric bolts that are easily accessible to customers but I have to think about it.

Shoot, now I'm behind on BOTH projects.

Oh, well. On, (what?) Friday, Joanne and I went to Chapters and I picked up four new books. I finished reading them yesterday then Joanne lent me another book this morning. THEN Lorry S. dropped off a bag of books this afternoon. Definitely a case of "thank her or curse her"...there were five books in the series I started reading in the books from Chapters, one Nora Roberts book that I hadn't read, two Jeffrey Archer books I hadn't read, an Alexander McCall Smith "#No. 1 Detective Agency book and another ten books that really look promising.

What's a girl to do?

Sunday, March 17, 2013

What a bargain!!!

Liz at Grandpa's Dollhouse just posted on Facebook this incredible house for sale!

Huge dollhouse for sale. This house was made from scratch and has many, many hours of work in it. It also includes a conservatory that attaches to the right side of the house. Doors and windows are also included. All it needs is someone who has the time to finish it. It is wired inside and includes many light fixtures, hand laid wood floors and loads of extras. Value of this house is far more than the asking price of just $1000.00 firm.

Photo: Huge dollhouse for sale.  This house was made from scratch and has many, many hours of work in it.  It also includes a conservatory that attaches to the right side of the house.  Doors and windows are also included.  All it needs is someone who has the time to finish it.  It is wired inside and includes many light fixtures, hand laid wood floors and loads of extras.  Value of this house is far more than the asking price of just $1000.00 firm.

Guess it's just as well I don't live in Ontario as this would surely tempt me. LOL

Top o' the mornin' to you!


May your blessings outnumber the shamrocks that grow, 
and may trouble avoid you wherever you go.

Friday, March 15, 2013

Miniature Math

Okay, this particular application of miniature math doesn't apply specifically to miniatures but you'll appreciate the idea...

I had $31.50 in my wallet from the Second Tuesday - sale of the bench kits and payment for shares of postage on the shipment of orders from Liz at Grandpa's Dollhouse.

So Joanne and I go shopping at Staples. My share of our order there is $17.00. I pay her that in cash.

We go to Chapters. She buys several books with a total cost of  (say $27.00). She has a credit on a gift card of $5.00, she has my cash repayment of $17.00 from Staples so her cost is $5.00.

The cost of my books is $17.00...the balance from my Second Tuesday money is $14.50....so I've only spent $2.50.

Heck, it's miniature math.............

And that's what works for me.....

Online Miniature Show, RL, MINIATURE MATH, Great tutorials (MC Kids Korner)

I haven't signed up for this as (1) I don't need any more "things" and (2) have to save up for Chicago International.

However, my good friend, Cheryl in Nova Scotia, is one of the dealers and is selling some wonderful items. My absolute favourite thing that she sells are the tartans. If you have any highland blood in you at all, you will be thrilled with these. Lots of other goodies too- but these are my absolute favourites. Please check it out!

Winter has returned to St. Albert! After a couple weeks of unseasonably warm weather, we've had about 6" of snow and temperatures of about -15C with wind chills in the -20s. But only for about a week, then it is supposed to warm up again.

Joanne and I went to Staples this morning to take advantage of a 15% off renovation sale (didn't see anything different except much more customer service in the aisles - but not at the checkout.) Nothing much there until we spotted this literature sorter. The MOST incredible product and price! I didn't need one as I already have three versions of them (that were much more expensive) but Joanne bought one. GREAT deal!

Then we headed over to our usual browse around Chapters!
How I love a book store! We hit one of the bargain tables (books from $2 - $5) and couldn't resist! I bought 2 for myself and 2 as Christmas stocking stuffers for my Mom and Leanne.

MINIATURE MATH: I'm going to blog about this again separately because it's our unique way of thinking!

Joanne donates an annual subscription to Miniature Collector magazine to the St. Albert Public Library (where she works).As the year passes, the library clears out the past year's subscription and Joanne buys the past year at a clear-out cost....and passes it on to me to read.

So you will understand if I'm not around for a few days....the only thing that trumps miniatures is reading!!!

But I want to strongly suggest that you check out Miniature Collector's Kids Corner. Don't let the name mislead you...these are simple tutorials that all of us can appreciate.


Wednesday, March 13, 2013

My order from Liz, Second Tuesday get-together


Elizabeth was asking about my order from Liz.

I got this desk and chair. It's very nice and the price was great but I've absolutely no idea where I'm going to use it. VBG


I'm a sucker for the 'little things' that I feel complete a scene. So got a potato masher, two pair scissors, two glue guns, two pair pliers and two rotary cutters - and a measuring cup.

Two plain ceiling lamps and two chandeliers.

This calculator and tape dispenser were in one of my grab bags.

First grab bag:

Second grab bag: lovely table kit in this one

The toy train can go in the toy shop; nice little pitcher, great vase nicely finished. Four decorative plates and I have another one like them in my stash.

There were ten of us here last night for Second Tuesday. I hadn't really planned anything but then I found a batch of bench kits I got from Cheryl Kerfoot in Ontario a couple years ago. So some worked on those while three who had missed the last get-together worked on making tables from scratch.

Pat and her son made these benches. Pat did a crackle finish on hers.


 And here's Trineke's.


Erika's waiting for the glue to dry on her table base.

Trineke returned from visiting her family in Holland and finally got to see the bed I made for her attic.

She brought me this lovely selection of chocolates. As you can see, the top of each chocolate wrapper has a Dutch tile design. There are 27 tiles 1 3/8" square.

She also brought me this great little cash register.

PLUS she brought a sheet of embossed miniature Delft tiles which she shared with all of us.


We also had a special guest join us for the evening. Gwen lives in the area and we've corresponded occasionally over the past while. She had had her order from Liz shipped to me with the others so it was a great opportunity for her to meet some fellow miniaturists and pick up her order. Didn't have as much time to visit as I would have liked though.

We discussed some ideas for the next Second Tuesday and think we'll be doing some canned food for a pantry, some spice jars, salt and pepper shakers, and a copper stock pot.