Tuesday, January 27, 2015

One way to get my rear in gear....

Because I have been concentrating so much on the workroom, the rest of the apartment needed a LOT of attention.

So I invited my DS Shirley, BIL Grahame and my Mom for dinner tonight. Got the kitchen, dining room and living room cleaned and dinner ready. Then I got a call from Shirley that she had been hit with a sudden migraine headache and had to cancel....so we changed our plans till tomorrow night.

Have a meeting tomorrow morning, coffee club in the afternoon and dinner tomorrow night so minis will probably take a back seat until Thursday.

Have a couple things to mention in the meantime:

I had this bedspread in my stash. I removed the white ribbon that had been threaded in it and have started replacing it with green.

Not sure if I like this or not....but it is a possibility!

Although I did order two wing chairs from Liz for the sitting room, I also have two House of Miniature wing chair kits in my stash. So thinking about possibly making up those using the green silk for upholstery.

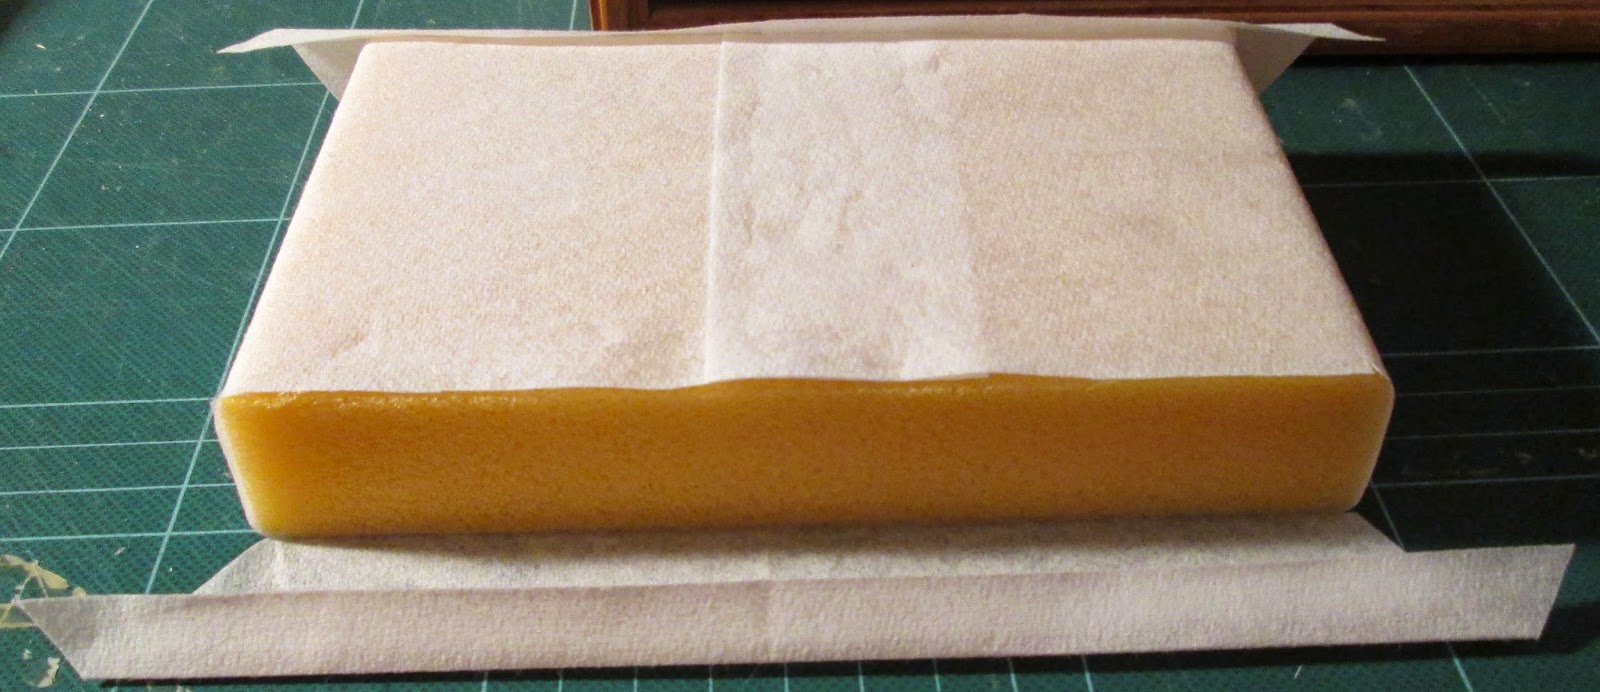
With that in mind, I took a small piece of the silk and tested two
 adhesives. The lower right side is glued with Elmers disappearing purple glue stick. It is holding well and there is absolutely no bleeding of the glue.

Immediately to the left of that, I tried a thin layer of Weldbond (my go-to glue for just about everything). It holds well but there is significant bleeding  which shows up as dark marks on the silk. Something to keep in mind.

Speaking of Weldbond, the bottle that I have is 600 ml (21.5 fl. oz.) which is a bit unwieldy to handle. I transferred some of the glue to the bottle that I bought at Busy Bee a couple weeks ago. Not only is the bottle easier to handle, the nozzle opening is quite small and it dispenses a smaller amount of glue. Very pleased with it!

Sunday, January 25, 2015

A Change of Pace

Was out Saturday afternoon (had dim sum for the first time, then visited the Muttart Conservatory for an early Chinese New Year celebration and fireworks). When I got home, had to help deal with an emergency in the condo so did not do any mini-ing.

Today (Sunday), I decided I had had enough of cleaning and sorting and needed to make something so I decided to start dressing the bed.

The bed is from the Reallife Miniatures bedroom kit set.

The mattress:

The fabric I am using to cover the mattress is actually a paper towel (one of a couple I took from a washroom a while back). It has very much the texture and weight of sewing pellon interfacing. For the top of the mattress, I first cut a piece of the towel to size so the top would have two layers of white to cover the colour of the foam.
Then I took a strip about an inch longer than the total of twice the length and depth of the mattress and the width of the mattress plus twice the depth plus about half an inch. I began by wrapping it as below and gluing the overlap.

 The mattress is a tight fit in the bedframe so I wanted to remove as much excess fabric as I could. I trimmed along the depth and bottom of the mattress on both sides.
I folded the remaining pieces up the sides of the mattress, ironed a crease for the bottom fold then glued and pinned those pieces to the bottom of the mattress.


 I folded the remaining flap around the corner:
 Clipped the excess fabric
 And glued it in place.

 Fits perfectly!
 I cut a top sheet from the same fabric, cutting out the bottom corners. The top has been folded back and a strip of lace (painted with a green Sharpie) glued to that.
 The top sheet was pinned to a piece of green silk. The silk was cut to size but not cutting out the corner pieces. I did, however, make a vertical cut up along the cut sheet.
 Oops! Missed a couple pictures here. I took the green silk and put it on top of the sheet, fitting the top of the silk under the folded down portion of the sheet. Then I pinned this on the mattress. The clipped corner of the sheet was folded in against the end of the mattress and the end piece folded over that and pinned in place.

I had this box pleated lace in my stash so glued it to the bed rails and held it in place with binder clips for a bedskirt:


Here is the bed so far:

Still not sure just how I will finish the top of the bed. The top will be just plain white fabric and I have lots of the box pleated lace to use on the top rails. May just stop at that.....or maybe I will try making hangings from this pleated fabric that was a collar on a blouse I got at the thrift store:


I have quite a bit of running around to do on Monday so may not get much of anything done until Tuesday.

Friday, January 23, 2015

Shopping, Starting All Over

On Thursday, Joanne and I went to Princess Auto so Joanne could get the parts drawer that was on sale.

30 Drawer Parts Storage Cabinet

Of course, we had to look around at everything! I found this drill which will be perfect for me to use with all the bits my neighbour, Tom, gave me.


Also picked up this hemostat which will come in handy.

Then we went to Costco. They put their food samples in this little black containers (which can be used as tubs) and are wonderful for glue and paints.

Starting all over:

First thing was to remove the light from the ceiling of the bedroom.
Fortunately, the Liquid Nails did not stick to the ceiling so there are only the screw holes to deal with.

 Then I put aside the roombox for now. I will go back to it when I have decided furniture and lighting placement. Then I can install the crown molding, baseboards, and lighting.

I have ordered two wing chairs and footstools from Liz at Grandpas Dollhouse for the sitting room. They will go on a small area rug in the centre of the room facing a fireplace - which I will make myself. Might build some shelves on either side of the fireplace but not sure about that yet. The door to the room will be on the fourth wall. There will not be a connecting door to the bedroom.

Then I will choose the rest of the furniture for the room from the pieces below:

These are the tentative pieces of furniture for the bedroom. The bed has to be dressed; the night stand needs to be made and painted white; and there is a Chippendale stool HOM kit that also needs to be made.

Most of the bathroom furniture and fixtures are undecided or unmade at this point. Will get back to those later.

There will be a faux connecting door between the bathroom and the bedroom.

Still not sure just what will be done with a closet.

Going out for most of the day tomorrow so may not get too much done.

Excuse me if the language is a bit stilted today - my apostrophe is not working at the moment. Hope I can fix it soon.

Wednesday, January 21, 2015

Our 'surprise' workshop at club last night was making plates with decals! What fun! I'll keep the one on the left and the one on the right is a gift for a friend who has that china pattern (without the tree) in RL.


My 'get up and go' got up and went about 4 p.m. yesterday but I got right back at it this morning and have finished the workroom itself.


Looks good, doesn't it!

And it would be lovely if that meant everything was done....but it's not...

I have this mess in the dining room to deal with now.


Which isn't quite as bad as it looks, really.

There are three shoe boxes that have to be sorted, organized and put on the bulletin boards. That's where the work comes in.

All the electrical has to be sorted into boxes: light fixtures (electrical and battery), fixture components and wiring materials. And I have to choose the fixtures that I think I'll use in the roombox.

There are somethings that need to be sorted in two boxes: the club garage sale and some things for the 'put and take'.

I'll use the second three room roombox to sort the furniture for the roombox so I can make those decisions.

So my plan for the rest of the day is to sort and put away everything but the three shoeboxes. Joanne and I are going shopping tomorrow so the shoeboxes will have to wait until Friday.


Tuesday, January 20, 2015

Faux book prep

I LOVE books - both in RL and in miniature. Although I make some of my own readable books, my 'go-to' person is Lee Ann Borgia - beautiful books at great prices.

Having said that, sometimes it's easiest to fill shelves with faux books. Dick Tabor (NY State) taught me his technique and was kind enough to share a bag of books with  me. Along the way, I've also made books by covering blocks of wood with printed covers.

Then I discovered this technique. You start with an old magazine with a glued spine. Using a metal straight edge and a utility knife, you cut a strip of the spine. As you cut, the pages peel off and you just keep repeating your knife stroke until you've cut through the back cover.


And end up with this:

You can print your own covers or use commercial covers such as these:


I had a stack of magazines saved for this so I cut them down for future use and easier storage.

Some forgotten items...

I generally have a pretty good memory for what I have - and where it is! So I was pleasantly surprised when I found some things that I had forgotten.

Believe I got this from Liz during last year's Daily Deals. Really like it!

Found these kits tucked away. Think I bought the Dragonfly kits in Phoenix a few years ago. No particular plans for any of the kits although I bought the stereoscope for the Victorian living room. Looks like a quick project so may make it and put in place later today.

Monday, January 19, 2015

Off to a good start...

I organized my furniture,etc., on the shelves. Lot more to add once I decide what will go in the roombox and return what I'm not using. But it's a good start!

Half the power went out in the building today so that interrupted my work and it was hard to get back at it but I pushed it and got this much done.


What on earth am I doing with EIGHT beds!

Hopefully, I'll get the rest of the room done tonight (or maybe tomorrow). Then I can tackle the boxes of accessories in the dining room and get everything on the bulletin boards. THEN I can get working on the roombox!

Got the club newsletter done for tomorrow night's meeting. Tina has a surprise workshop for us so looking forward to that.

Sunday, January 18, 2015

Major changes in plans...

First of all, as much as I like the light bar in the room(s):


the rooms call out for individual lights....and I certainly have enough of them:

Lower left is a huge selection of lights, plugs and lamp shades.

The ones on the left are battery operated. The pale blue sconces in the middle are from Petite Images. Just love them.
So I'm going to light the rooms with these fixtures which, of course, means that lighting will be on hold until I decide on furniture and its placement.

Additionally, I've bought some new furniture for the sitting room from Grandpa's Dollhouse Daily Deals. The two couches I had originally planned for the sitting room are beautiful pieces of furniture but they would be terribly uncomfortable in a sitting room. (I think they'll end up on the patio that's planned for the Bombay house.) So I've ordered two wing chairs and two footstools from Liz.

I also want to put a closet in. Space-wise, it would fit better in the bathroom but my head tells me it should be in the bedroom. (I'll put a faux door between the bedroom and bathroom) The door to the sitting room will be in the hall.)

I've some new pieces that I want for the rooms so they're on my to-do list.

I think, though, that my major immediate thrust should be to put away all the accessories that are in shoeboxes in my workroom and do some tidying in there.

One way or the other, I WILL work on something tomorrow and tell you about it. Promise!