This is a tutorial I taught to my miniature club Miniature Enthusiasts of Edmonton. You are more than welcome to use it for your club or group of friends. Nice if you would acknowledge me but not necessary. If you need more information or help, email me at stalbertmini@gmail.com
SPICE JARS
The Kit
10 12.5 mm
x 5mm beads (These are Creatology beads from Michael’s. They come in 5 primary
colours and also 5 pastel colours.)
10 silver/gold
Recollection brads from Michael’s
A label
with 14 printed names of spices. These are printed on Avery 5163 labels.
Scissors
and/or X-Acto knife and ruler
Glue
Toothpick
Needle nose pliers
Instructions:
This is pretty rudimentary – You cut out the label, attach it to the bead – pop the brad in top! And Voila, you’re finished.
You can cut
out the labels freehand with scissors or use an X-Acto knife and straight edge.
Peel the
back off and stick the label to the bead.
I did cut the
labels freehand with scissors but I wasn’t as confident putting them on the
beads. So I found a scrap of 3/16 inch thick wood in my stash and made a bit of
a jig to glue the labels on relatively straight.
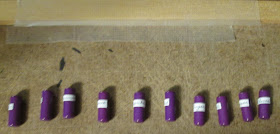
With the beads in place, add a strip of tape face-down on top of your piece of wood in line with where you want the top of your labels.
Carefully
cut your labels out, peel the backs off and position them in place below the
upper row of tape. (I just use my thumb nail to separate the label from the
backing but you could also use your X-Acto blade to do that.)
Remove the
beads from the jig and make sure that the labels are firmly attached.
To ensure
that the brads fit flat in the beads, take your needle nose pliers, hold them
against the bottom of the brad and squeeze tightly.
Use the
toothpick to drop glue in the hole and top of the bead
Pop the
brad in the top of the bead.
Continue gluing the brads in place and you’re finished!


No comments:
Post a Comment